.jpg?table=block&id=7c97bf68-d5b2-4b4f-82a6-9627861f48fb&cache=v2)
Introduction
Do you create certificates at your school, company or organization? If you answered yes, you might have considered creating certificates in Microsoft Word
Since MS Word is one of the most popular word processing programs and offers a few certificate templates, it's a common go-to tool for making certificates for non-techies.
.webp?table=block&id=9a25872c-82ad-4062-b632-4a20d3708c36&cache=v2)
Creating a certificate in Word is easy than you might think. This step-by-step guide will make the process even more easier. We will cover two methods: Using a certificate template in MS Word and creating a stunning certificate from scratch in MS Word.
We will not only help you create an award certificate in Word, but we will also introduce you to a platform called Certopus, which is more user-friendly and efficient than MS Word if you need to issue professional certificates.
Create a certificate in Word
Now that we have dived into the guide for creating certificates in word, you might be wondering how to do it. Well, there are two main methods for creating a certificate in Word that you can use: using a template or creating a custom design from scratch. In this tutorial, I will show you both methods and explain the pros and cons of each one. You can choose the method that suits your needs and preferences best.
Method 1: Creating certificate in MS Word using a template
Creating a certificate in Word is simple when you utilize a template. A template is a pre-made document that has a design and layout that you can change and fill in with your own information. Word has many templates for different kinds of certificates, such as award certificates, gift certificates, diploma certificates, and more.
Here’s how to create a certificate in Word using a certificate template:
Step 1. Open a new document in Word. You can do this by clicking on the Word icon on your desktop or on your computer’s “Home” menu. This opens a screen with “New” at the top and a list of options for templates to use, with a “Search” bar at the top of the page that lets you search for specific types of templates.
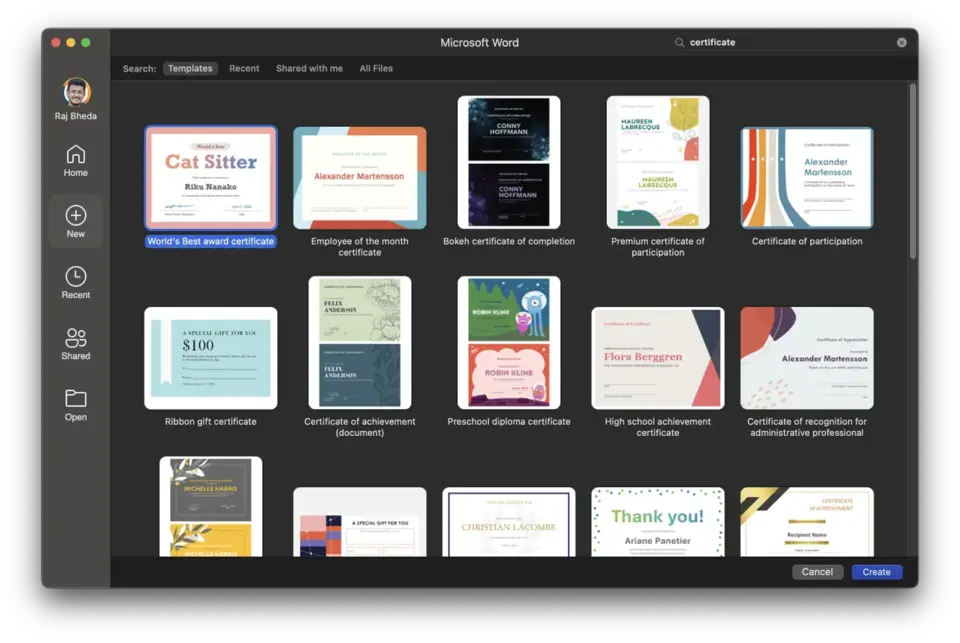
Step 2. Navigate to the “Certificate” template options. Once you have a new document open, find the “Certificate” templates among the options that Word offers.
A simple way to do this is to use the “Search” bar at the top of the page and type “Certificate” into the text box. This then displays all the different certificate templates that MS Word offers.
Step 3. Choose the template you want to use. As Word provides several options for certificate templates, it can be important to make sure you choose the template that best fits your current project.
For example, some templates use bright colors and intricate designs, which might be ideal for celebratory events or schools. Other templates have a more professional design, with neutral colors and minimal decoration, which can be useful for professional accomplishments and qualifications.
Step 4. Create the certificate. Once you’ve selected the template you want to use, click on it and then click “Create”.
This will open the template in a new document where you can edit it according to your needs. You can change the text by clicking on it and typing your own information, such as the name of the recipient, the name of the issuer, the date, and the reason for the award.
You can also change the fonts, colors, and layout of the text by using the formatting tools on the “Home” tab. To add images or logos to your certificate, you can use the “Insert” tab and choose from the options available, such as pictures, shapes, icons, etc. You can resize and move these elements by dragging them with your mouse.

Step 5. Make your certificate more attractive and unique. To make your certificate stand out from others, you can use some additional features that Word offers, such as borders, backgrounds, watermarks, etc.
For example, you can add a border to your certificate by going to the “Design” tab and clicking on “Page Borders”. This will open a dialog box where you can choose from different styles, colors, widths, and art for your border.
You can also add a background color or texture to your certificate by going to the “Design” tab and clicking on “Page Color”. This will open a menu where you can choose from different colors or fill effects for your background.
You can also add a watermark to your certificate by going to the “Design” tab and clicking on “Watermark”. This will open a menu where you can choose from different preset watermarks or create your own custom watermark.
Method 2: Creating certificate in from scratch / custom design.
Another way to create a certificate in Word is to use a blank document. This method gives you more control and creativity over your design but also requires more time and effort. You’ll need to design your certificate from scratch by inserting text boxes, shapes, lines, images, etc., and arranging them on the page.
Here’s how to create a certificate in Word using a blank document:
Step 1. Set up a blank document in Word with the appropriate orientation, margins, and page size for a certificate. You can do this by clicking on the Word icon on your desktop or on your computer’s “Home” menu.
This opens a screen with “New” at the top and a list of options for templates to use, with a “Search” bar at the top of the page that lets you search for specific types of templates. Here, you can choose “New Blank Document” and click “Create” to open your new document.
To change the orientation of your document from portrait to landscape, which is typical for certificates, go to the “Layout” tab and click on “Orientation”.
This will open a menu where you can choose between portrait and landscape.
To change the margins of your document, go to the “Layout” tab and click on “Margins”. This will open a menu where you can choose from different preset margins or customize your own margins.
To change the page size of your document, go to the “Layout” tab and click on “Size”. This will open a menu where you can choose from different preset sizes or create your own size.

Step 2. Design your certificate from scratch by inserting text boxes, shapes, lines, images, etc., and arranging them on the page. To insert text boxes, go to the “Insert” tab and click on “Text Box”. This will open a menu where you can choose from different styles of text boxes or draw your own text box anywhere on the page. You can then type your text inside the text box and format it using the tools on the “Home” tab.
To insert shapes, go to the “Insert” tab and click on “Shapes”. This will open a menu where you can choose from different types of shapes, such as rectangles, circles, stars, etc., or draw your own shape anywhere on the page.
You can then resize and move these shapes by dragging them with your mouse. You can also change their color, outline, and fill using the tools on the “Format” tab.
To insert lines, go to the “Insert” tab and click on “Shapes”. This will open a menu where you can choose from different types of lines, such as straight lines, curved lines, arrows, etc., or draw your own line anywhere on the page. You can then resize and move these lines by dragging them with your mouse. You can also change their color, width, and style using the tools on the “Format” tab.
To insert images or logos, go to the “Insert” tab and click on “Pictures”. This will open a dialog box where you can browse and select an image file from your computer or online sources. You can then resize and move these images by dragging them with your mouse. You can also crop, rotate, or adjust their brightness, contrast, and color using the tools on the “Format” tab.
Step 3. Choose the right fonts, colors, and alignment for the certificate elements and ensure consistency and balance in the design. To choose the fonts for your text boxes, select the text you want to format and use the tools on the “Home” tab to change the font type, size, style, and color. You can also use the font dialog box by clicking on the small arrow in the bottom right corner of the font group.
To choose the colors for your shapes, lines, and images, select the element you want to format and use the tools on the “Format” tab to change the color scheme, outline, and fill effect.
To choose the alignment for your elements, select the element you want to align and use the tools on the “Format” tab to change the horizontal and vertical alignment. You can also use the “Align” command on the “Layout” tab to align your elements with each other or with the page margins. To ensure consistency and balance in your design, try to use the same fonts, colors, and alignment for similar elements, such as titles, names, dates, etc.
You can also use the “Distribute” command on the “Layout” tab to arrange your elements equal distances from each other.

Disadvantages of MS Word Certificates
Creating a certificate in Word can be a convenient and affordable option if you need a simple and quick solution. However, it also has some limitations and challenges, such as:
- Lack of verification: Your certificate may not be recognized or accepted by some institutions or organizations that require a more secure and verifiable form of certification.
- Lack of security: Your certificate may be easily copied, forged, or altered by others who have access to your document or file.
- Lack of integration: Your certificate may not be compatible or integrated with other platforms or applications that you use for your business or education, such as learning management systems, LinkedIn, email marketing tools, other social media networks, etc.
If you’re looking for a better alternative to creating certificates in Word, we recommend you try Certopus. Certopus is a digital credentials platform that lets you design, generate, store, and send verifiable certificates and digital badges right from your fingertips.

With Certopus, you can enjoy more features and advantages, such as:
- A rich library of professionally designed templates that you can customize with a few clicks
- A simple and fast process of bulk generating and delivering personalized certificates to recipients via email
- A secure and verifiable way of storing and issuing digital certificates that can be easily accessed, shared and verified online
- A powerful analytics tool that provides insights on the performance and impact of your certification campaign
If you’re ready to take your certification process to the next level, sign up for Certopus for free and get 50 free certificate credits to try out the service. Visit Certopus today and start creating amazing certificates in minutes!
Claim your free 50 credits here https://app.certopus.com
Frequently Asked Questions ( FAQ )
How do I save a certificate in Word as a PDF?
To save a certificate in Word as a PDF, go to the “File” tab and click on “Save As”. This will open a dialog box where you can choose a location and a file name for your certificate. Then, click on the “Save as type” drop-down menu and select “PDF”. Click on “Save” to complete the process.
How do I add a signature to a certificate in Word?
To add a signature to a certificate in Word, you can either insert an image of your signature or use the “Signature Line” feature. To insert an image of your signature, go to the “Insert” tab and click on “Pictures”. This will open a dialog box where you can browse and select an image file of your signature from your computer or online sources. You can then resize and move the image to the desired location on your certificate. To use the “Signature Line” feature, go to the “Insert” tab and click on “Signature Line”. This will open a dialog box where you can enter the signer’s name, title, email address, and other information. You can also choose whether to show or hide the date and instructions for signing. Click on “OK” to insert the signature line on your certificate. You can then sign the certificate by double-clicking on the signature line and following the instructions.
How do I print a certificate in Word?
To print a certificate in Word, go to the “File” tab and click on “Print”. This will open a dialog box where you can choose your printer, paper size, orientation, and other settings. You can also preview your certificate before printing by clicking on “Print Preview”.
Need more information?
Schedule a demo to learn more about Certopus for your business use case, or if you have any questions, don't hesitate to contact us. We would be delighted to assist you. Finally, if you're on social media, follow us to remain informed about our latest developments and learn more about digital credentials like certificates, badges, and micro-credentials.
Recommended Articles: